스마트 창고 시뮬레이션 도중 렌더링 성능 최적화를 하였던 걸 개념과 함께 간단히 정리한 내용.
리액트의 렌더링 조건
리액트의 컴포넌트는 다음 3가지 조건 중 하나를 충족하면 리렌더링된다.
- 부모 컴포넌트가 리렌더링될 때
- 부모 컴포넌트로부터 받는 props가 변경될 때
- 컴포넌트 내의 state가 변경될 때
- 컴포넌트가 구독하고 있는 Context 값이 변화할 때
렌더링 최적화
React.memo
function Greeting({ name }) {
  return <h1>Hello, {name}!</h1>;
};

export default React.memo(Greeting);
렌더링 조건 1인 부모 컴포넌트가 리렌더링 될 때에 자식 컴포넌트 리렌더링을 막기 위해 사용된다.
React.memo의 함수로 감싸면, 해당 컴포넌트는 부모 컴포넌트가 리렌더링되어도 리렌더링되지 않고, props가 변경될 때에만 리렌더링된다.
useMemo, Derived State
function Page() {
  const { user } = queryUser()

  // return <Greeting user={user} /> <- BAD
  return <Greeting name={user.name} age={user.age} /> // <- GOOD
}
자식 컴포넌트에 React.memo를 적용하여도 Props가 계속 변경되면 리렌더링이 발생한다.
특히 Props가 객체인 경우, 객체 내부의 내용이 같아도 객체의 참조값이 지속적으로 변경되면서 자식 컴포넌트에 리렌더링이 발생한다.
이를 방지하기 위해 props로 전달할 값에 useMemo를 사용하거나, 객체에서 원시값을 추출하여 직접 props로 전달하는 것이 좋다.
Selector
컴포넌트가 구독하고 있는 Context 값이 변화하는 경우는 Zustand를 비롯한 많은 상태관리 도구에서 발생한다.
const { id } = useUserStore();
위와 같이 zustand 상태를 통으로 구독하면 zustand의 상태가 하나만 변해도 리렌더링이 발생한다.
const id = useUserStore(s=>s.id);
위와 같이 Selector를 이용하여 참조하고자 하는 상태를 명확하게 지정하여 준다.
셀렉터 하나에서 여러 개의 상태를 지정하여 객체로 반환하고자 할 때에는 zustand/react의 useShallow를 이용하여 1deps까지 비교하여 반환할 수 있다.
const { id, name, age } = useUserStore(
  useShallow((s) => ({
    id: s.id,
    name: s.name,
    age: s.age
  }))
);
스마트 창고 시뮬레이션 렌더링 최적화
스마트 창고 시뮬레이션의 기본 원리는 아래와 같다.
- 컨베이어 벨트 모양의 Path를 지정한다.
- MovingBox가 컨베이어 벨트를 따라 이동한다.
- MovingBox와 Worker가 일정거리 이상 가까워지면 MovingBox가 사라지고 Worker가 작업을 시작한다.
// useWarehouse2D
  useEffect(() => {
    if (!running) return;
    const animate = () => {
      if (paused && !loadedParcels.length) return;
      setLoadedParcels((prev) => {
        const newParcels = prev.map((c) => {
          let next = c.progress + speed;
          if (next >= 1) next = 0;
          return { progress: next, id: c.id };
        });
        return shallow(prev, newParcels) ? prev : newParcels;
      });
      requestRef.current = requestAnimationFrame(animate);
    };
    requestRef.current = requestAnimationFrame(animate);
    return () => {
      if (requestRef.current !== null) {
        cancelAnimationFrame(requestRef.current);
      }
    };
  }, [speed, running, paused, loadedParcels.length]);
컨베이어에 벨트가 올려지면 requestAnimationFrame으로 실시간으로 계산을 하게 되고, 이에 따라 컴포넌트들이 실시간으로 로딩하게 된다.
Derived State
export default function Warehouse2D() {
  // warehouseStore에서 상태 가져오기
  const { workerCount, loadedParcelIds } = useWarehouseStore([
    "workerCount",
    "loadedParcelIds",
  ]);

  // Worker 컴포넌트들
  const workerComponents = useMemo(
    () =>
      Array.from({ length: workerCount }).map((_, i) => (
        <Worker key={i} index={i} position={RECEIVE_WORKERS[i]} />
      )),
    [workerCount]
  );

  // MovingBox 컴포넌트들
  const movingBoxComponents = useMemo(() => {
    return loadedParcelIds.map((loadedParcelId, i) => (
      <MovingBox key={i} loadedParcelId={loadedParcelId} />
    ));
  }, [loadedParcelIds]);
렌더링된 화면을 시뮬레이션하는 Warehouse2D 컴포넌트에서는 loadedParcel을 그대로 가져오는 것이 아니라 id 배열만을 저장한 loadedParcelIds라는 파생값을 zustand로부터 읽는다.
loadedParcelIds는 컨베이어 벨트에 소포가 추가되거나, 제거될 때에만 변경이 이루어진다.
이를 토대로 MovingBox라는 배열을 렌더링한다.
Selector
export const Worker = React.memo<WorkerProps>(({ index, position }) => {
  const catchTimes = _useWarehouseStore((s) => s.workerCatchTimes[index]);
  const brokenUntil = _useWarehouseStore((s) => s.workerBrokenUntil[index]);
  const workerCooldown = _useWarehouseStore((s) => s.workerCooldown);
  ...
  return (<div>
        ...
      <CooldownTimer
        index={index}
        position={position}
        catchTimes={catchTimes}
        brokenUntil={brokenUntil}
        workerCooldown={workerCooldown}
        setIsWorking={setIsWorking}
        setIsBroken={setIsBroken}
      />
  </div>)
이렇게 MovingBox와 Worker 컴포넌트에 각각 id와 index를 넘겨주면, 해당 컴포넌트에서 zustand 상태에서 selector로 조회하여 사용한다.
한편 Worker 컴포넌트에서도 쿨다운 타이머만 실시간으로 렌더링되기 때문에 이를 하위 컴포넌트로 분리했다.
그리고 실시간 렌더링 뿐 아니라 실시간 메시지 전송과 같은 로직도 해당 컴포넌트에서 진행한다. 이렇게 하면 Worker Component는 박스를 잡은 상태 / 잡지 않고 대기하는 상태. 두 가지 상태만 렌더링한다.
const CooldownTimer = React.memo<{
  index: number;
  position: { x: number; y: number };
  catchTimes: number[];
  brokenUntil: number;
  workerCooldown: number;
  setIsWorking: (working: boolean) => void;
  setIsBroken: (broken: boolean) => void;
}>(
  ({
    index,
    position,
    catchTimes,
    brokenUntil,
    workerCooldown,
    setIsWorking,
    setIsBroken,
  }) => {
    const [currentTime, setCurrentTime] = useState(Date.now());
    const channelRef = useRef(createChannelInterface("warehouse-events"));

    useEffect(() => {
      let animationId: number;

      const updateTime = () => {
        setCurrentTime(Date.now());
        animationId = requestAnimationFrame(updateTime);
      };

      animationId = requestAnimationFrame(updateTime);

      return () => {
        if (animationId) {
          cancelAnimationFrame(animationId);
        }
      };
    }, []);
WillChange
MovingBox는 실시간 렌더링이 되기에 더 최적화를 해서 willChange 속성을 추가했다.
// 이동하는 박스 컴포넌트 (메모이제이션)
export const MovingBox = ({ loadedParcelId }: MovingBoxProps) => {
  const progress = _useWarehouseStore(
    (s) => s.getLoadedParcelById(loadedParcelId)?.progress
  );
  const movingBox = calculatePositionOnBelt(progress || 0);

  return (
    <g
      transform={`translate(${movingBox.x - 20}, ${movingBox.y - 28})`}
      style={{
        willChange: "transform",
      }}
    >
      <image href={closedBoxSvg} x={0} y={0} width={40} height={40} />
    </g>
  );
};
willChange 속성을 추가하면 GPU 가속을 통해 별도의 레이어로 분리해서 렌더링된다.
이를 확인하기 위해서는 Chrome -> 개발자 도구 -> More Tools -> Rendering에서 Paint Flashing을 켜보면 된다.
리페인트가 일어나는 컴포넌트는 초록색으로 빛나게 된다.
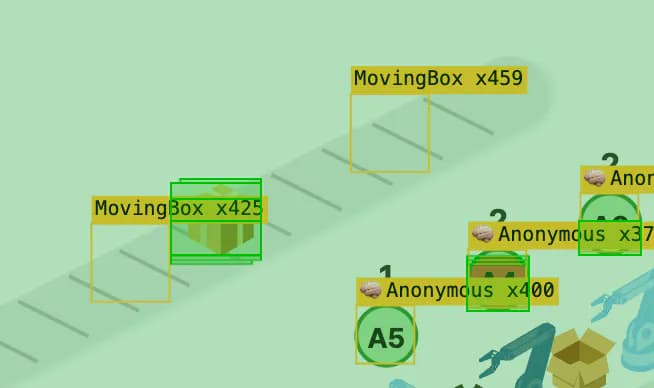
CSS에 WillChange 속성을 주면 아래와 같이 MovingBox가 리페인트가 일어나지 않게 된다
